Codeplugs for fun and profit - Anytone AT-D878UVII Plus codeplugs
Overview
How do you create a codeplug for a DMR radio? Let's go through it step by step
Codeplugs
This post is really a place to dump my process for creating my codeplug. I'm doing it for two reasons:
- I'll forget and when I want to make changes in six months time, I'll have no idea where to start and have to research it all again. Of course, writing it down means I won't forget, but let's leave that well alone.
- It's a starting point for others. This isn't the best way, but I think its a logical way to approach the task
What is a codeplug?
I found a good website article from Minnesota DMR that says the original codeplug was from the days before microprocessor controlled radios. Options on a radio where controlled by plugging small jack plugs into sockets to set options, called codeplugs. The name stuck and now refers to the software defined configuration of a radio.
In the case of my Anytone AT-D878UVII Plus, they supply Windows software called CPS (CodePlug Programming Software) that let's you configure the radio and download the file to the radio over an FTDI like cable. You can also upload data back from the radio (more on that later).
What features of the codeplug are we going to configure?
I'm planning on walking through a codeplug that allows the following features:
- Local analogue repeater access
- Local digital (DMR) repeater access
- Home hotspot access
- APRS beaconing
- Digital beaconing
- APRS messaging
- Digital messaging
I'm not intending to write a full Digital Voice primer. More, I'm going to point at the resources I used, so this should be a decent list if you are new to Digital Voice.
- I found this blog post which is a good summary of the modes: Blargh blog
- Specifically, on DMR, the DMR Guide is well worth reading.
- The video below is also well worth a watch. It covers DMR and is very accessible.
Getting Started
The recommended procedure, if you are starting from a clean radio or have upgraded the firmware, is to clear the radio and then to upload from the radio back into the CPS. The version of the CPS and the firmware on the radio must match, and I'll leave that as an exercise for the student.
Reset the Radio
So the process is:
- Make sure you have the latest CPS and firmware on your radio. If not, update one or both. If you are updating the CPS then make sure to export all your data first, just in case the CPS format has changed between versions.
- Reset the radio.
- Power off the radio and make sure the programming cable isn't connected.
- Hold down the PTT button and the PF1 button (on the side under the PTT, NOT the P1 button on the face of the radio)
- Whilst holding the buttons. Power on the radio.
- The Radio will ask if you want to confirm you want to initialize the radio, push the GREEN key to confirm.
- You will now have to set the timezone, current date and time. The radio will then be booted but empty.
- Now connect the radio to your PC and upload the radio to the PC CPS.
Downloading reference files
You now have a clean radio and a blank CPS and codeplug. We now want to add our channels and talk groups and the like. First, we need to download some files.
Contact List
You will at least need a contact list, which is a list of DMR ID (each user has a unique ID) mapped to Call Sign, name and other details. The Anytone can hold the complete list, but other radios might have to prune down the list.
The list can be obtained from a number of sources:
- RadioID.net - a csv file of the whole database of DMR IDs
- DMR Contacts in Anytone format - a csv ready to import into the CPS. I currently use this source
- Pi Star - they provide a live link to the DMR ID list in Anytone format
Talk Groups
Depending on the network that you plan to use, you will want a list of Talk Groups. Again these can be downloaded from a number of source. I've got talk groups for Brandmeister and DMR Plus (Phoenix in the UK)
- Brandmeister has a page when you can download all the current TGs as a CSV
- Pi Star has a link to a list of BM TGs.
- Pi Star also has a page where you can pick what you want / need. I use this method
Repeaters
You will also need a list of DMR capable repeaters, their frequencies, colour codes and timeslots. There are a number of sources of this info:
- UK Repeaters has a list that can be broken down by band (2m and 70cms) and network (Brandmeister, DMR Phoenix and DMR Plus (mostly Scotland)). I pick from this source (I'll say how later)
- Repeater Book has similar functionality to UK Repeaters.
- Phoenix UK has a page listing all the repeaters in its network.
Loading Reference Data into CPS
The next step is to get our various csv files into the CPS software. Luckily, the software is pretty straightforward and has a nice simple import / export capability for all the data that you'd want to import or export.
If you aren't sure of the format of the csv file, export the relevant page and it will give you a blank CSV that you can amend and reimport.
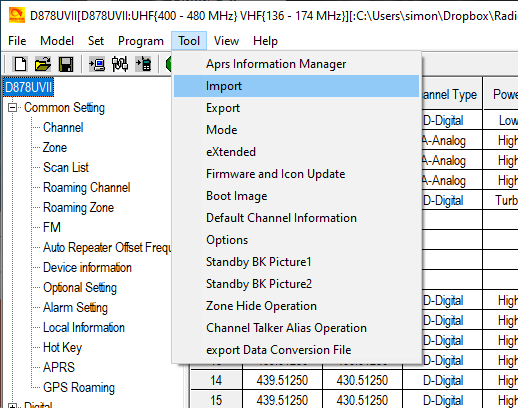
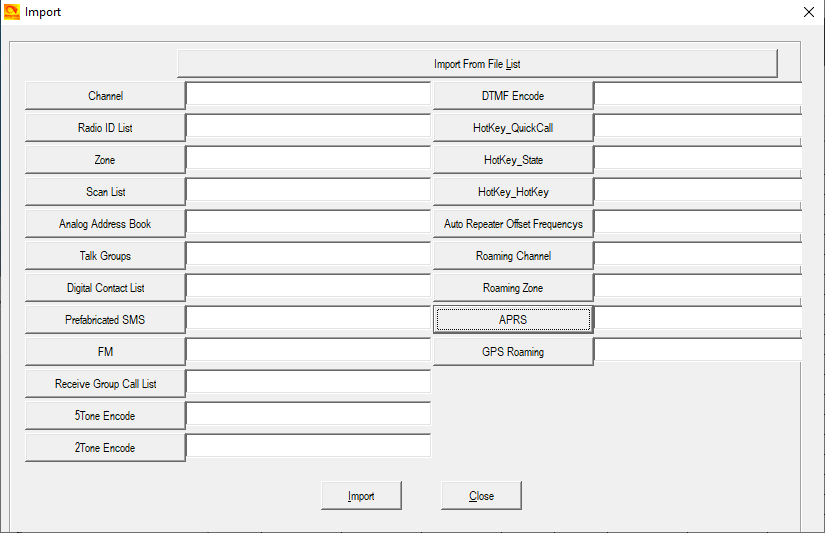
We want to import the reference data. From the menu, select Tool / import
This will give you the following dialog:
Click on Digital Contact List first and import your Contact List. Then select Talk Groups and do the same. I tend to not import the repeater list directly into Channels. Instead, I'll show you my method next.
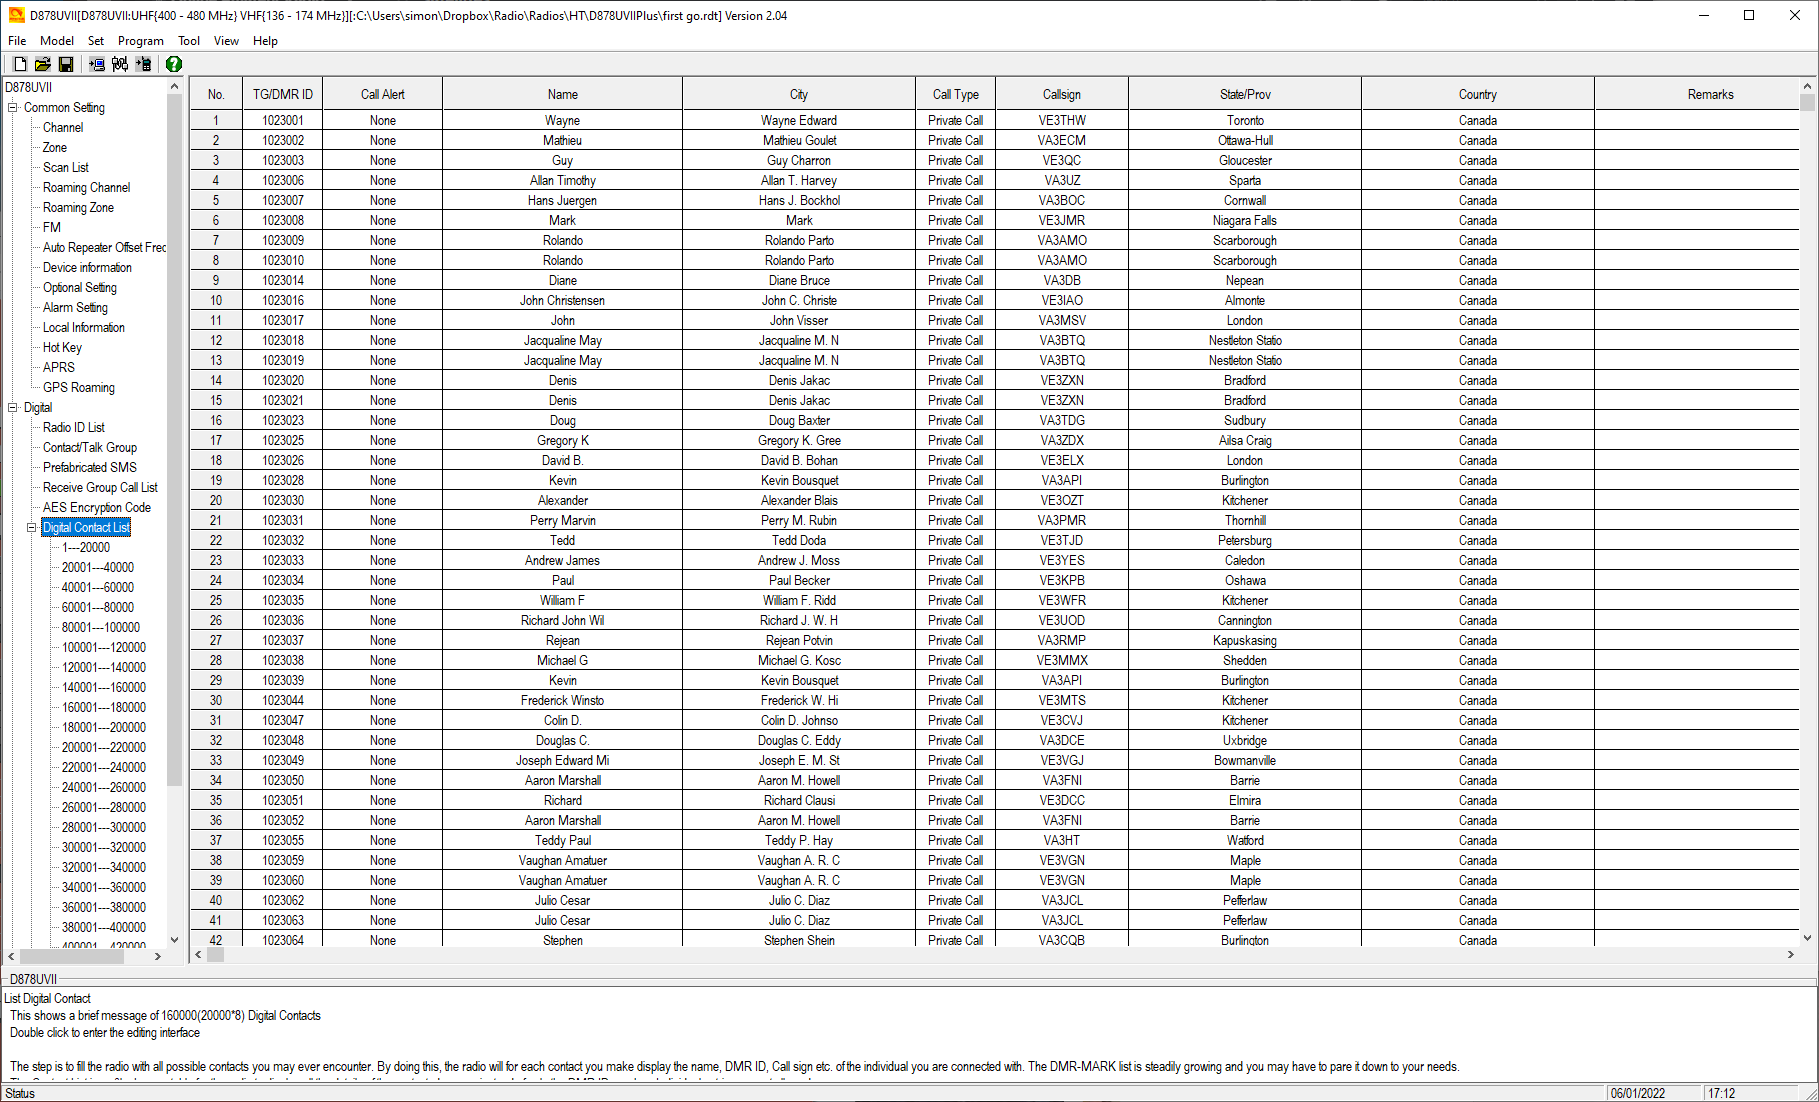
To check you have imported your data, you can click and expand the Digital menu item and click on Contact/Talk Group and expand Digital Contact List to check the data has imported correctly.
What is a Channel?
In this radio a channel is not just a frequency like in an analogue radio. It is a combination of a repeater and a talk group. So each talk group on a repeater is a separate channel. It is quite possible to just assign a single channel for a repeater and manually dial TalkGroups as needed and I often work in this mode. But I'm going to show how to code in the most common TalkGroups and you can manually dial the rest.
Channels - my method
I set up my channels in a few patterns:
- Analogue Voice Repeaters
- Digital Voice Repeaters / Hotspots that are local to me.
- Remote Digital Voice Repeaters
- Simplex Spot Frequency Channels
I'll detail each pattern and explain my logic and show some examples.
1. Analogue Voice Repeaters
Analogue Voice Repeaters are the simplest to set up. You only really need to know the repeater shift and the CTCSS tone frequency.
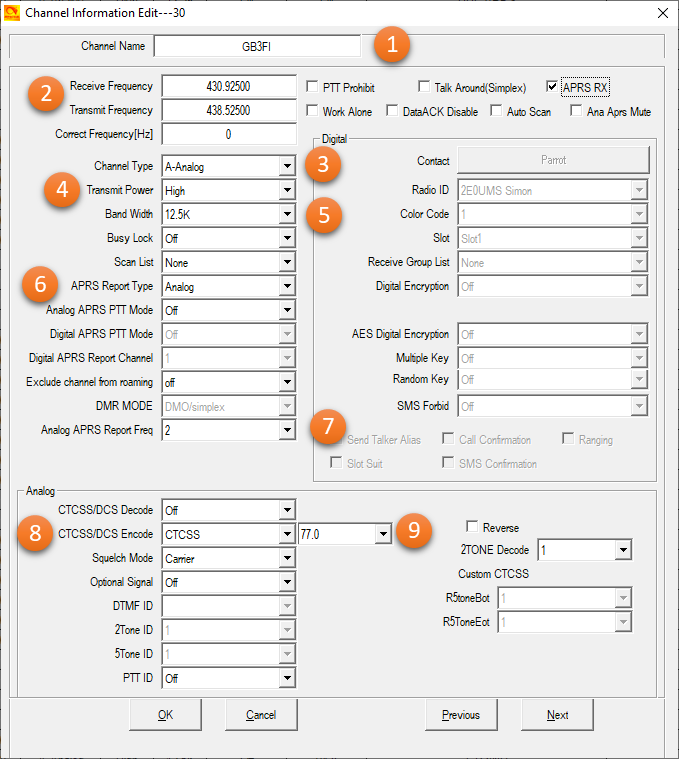
- Set the Channel Name - usually the callsign of the repeater
- Set the RX and TX frequencies of the repeater
- Select A-Analog
- Set your desired Transmit Power - I've gone for High which is about 5W
- Set Bandwidth to 12.5k for NFM
- If you want to be able to send APRS from the channel (I have it bound to PF3 Short Key), then set this is Analog
- Again for APRS set this to your VHF or UHF APRS frequency (see APRS section)
- Set CTCSS/DCS Encode to CTCSS
- Set your CTCSS tone as per the repeater, in this case, it is 77Hz.
2. Digital Voice Repeaters
This is a little more complex, but it builds on the basics of the first pattern. Again we set the channel name and RX / TX frequencies, but we also have to set up the Talk Group. I tend to set up all the talk groups that I use most often on my Hotspot and my Local Repeater and then just the Local Channel for other repeaters as I can still 'dial' a Talk Group manually. So I'm using Channels as a shortcut for things I use the most, rather than mapping out every combination of repeater and talk group. Here is an example:
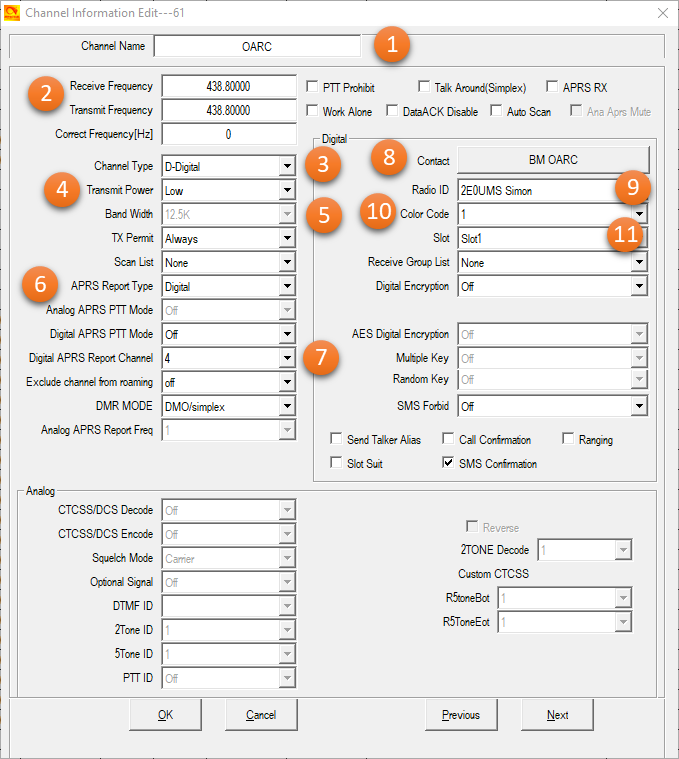
- Set the channel name, I tend to either use the talk group (if its my hotspot, as I will see the zone and the channel name), or the Repeater Name and TG.
- RX and TX frequencies
- Channel type to D-Digital
- As this is my hotspot, Trasmit Power is set to Low.
- Bandwidth is greyed out
- APRS Report Type is set to Digital (see APRS later).
- Digital APRS Report Channel is set to 4 (see APRS later).
- Contact is set to the Talk Group that is the default for this channel, in this case BM OARC. You can override this and dial another talk group but this is the default.
- You should only have one radio id, so pick it.
- Set the Color Code of the repeater, in this case 1.
- Set the time slot of the repeater, in this case Slot1
Here is a local repeater example and I'll call out the differences
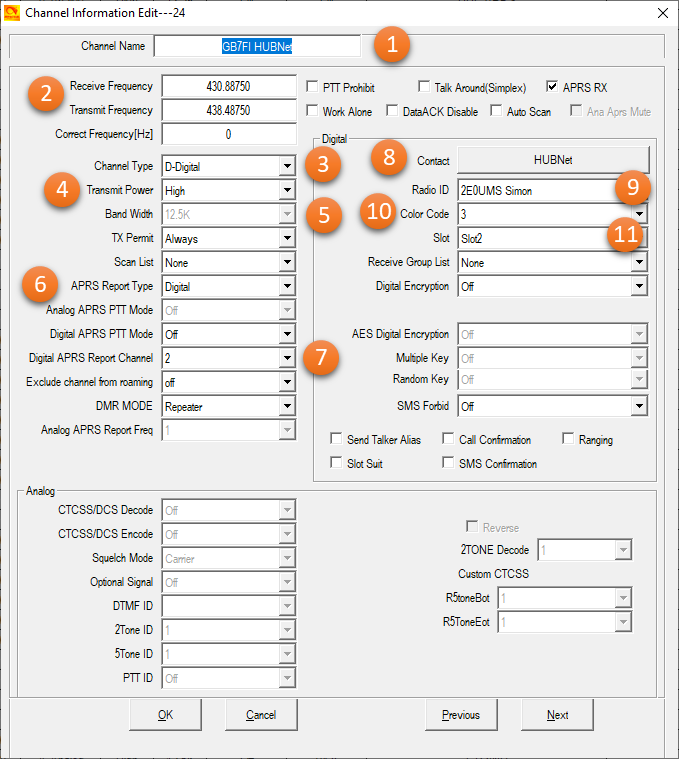
- You can see I've used the Repeater Name and Talk Group as the Channel Name
- RX and TX split is set
- No change
- No change
- No change
- No change
- No change
- Selected the HubNET Talk Group
- No change
- Repeater is Color Code 3
- Repeater is Slot Slot2
3. Remote Digital Voice Repeaters
The difference for Remote Digital Voice Repeaters is that I only set up a single channel with the Local Talk Group selected. I won't show another example to save space.
4. Simplex Spot Frequency Channels
There are often spot channels that you want to set up, like the 2m Calling Channel or the APRS Frequency. I also set up the SOTA calling channel. These are set up like an Analog Voice Repeater but you don't need the split of RX / TX or the CTCSS setup. Again, I won't show an example.
APRS Setup
There are a number of steps to getting APRS configured on the Anytone. Broadly, there are three steps:
- Enable APRS in the Codeplug
- Configure APRS in the Codeplug
- Set up your channels to support APRS (see already in the channel section)
Enable APRS in the Codeplug
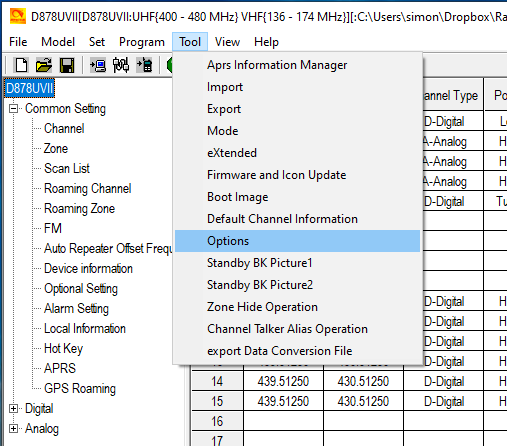
The first step is to enable APRS in the codeplug. Select the Tool / Options menu item.
Next you need to select APRS from the menu and click OK.
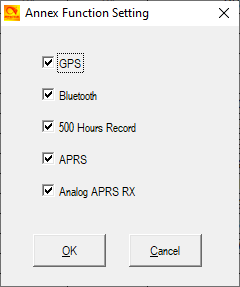
This will enable a new item on the left hand side menu called APRS.
Configure APRS in the Codeplug
This APRS page is shown below and I've numbered the key items to configure.
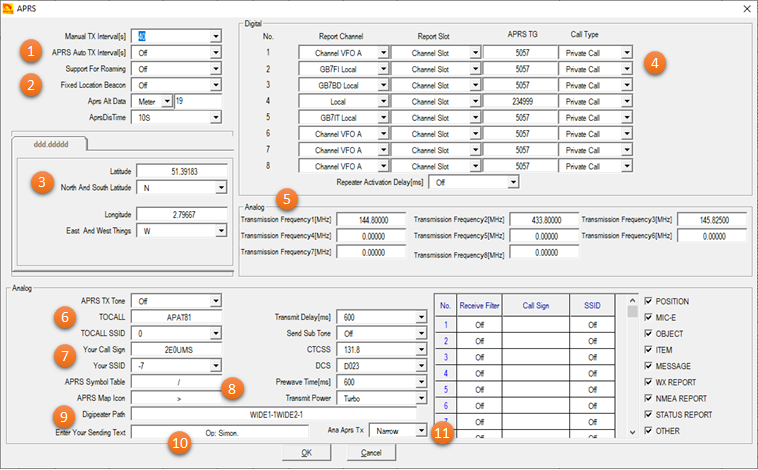
- If you want your handset to 'auto beacon' then you can set the interval here. I have mine set to off as I trigger it manually and you can set this on the HT later if required using the APRS / Intervals Set option.
- Fixed Location Beacon lets to choose to send a fixed location (specified in 3) or use the GPS. Note that if this is set to Off then you can't send an APRS beacon until you had GPS lock. This can also be toggled on the HT using the APRS / Upload Beacon / GPS Beacon or Fixed Beacon options.
- Here you can set the lat / long of your fixed beacon.
- For Digital Voice Repeaters or Hotspots, here is where you set up which channel / Talk Group you want to use. See your network for details, it will vary between Brandmeister and DMR Plus. I have 2 set to Phoenix APRS TG which is Private Call 5057, I have 4 set to Brandmeister which is Private Call to 234999. This is what you set in a channel under the Digital APRS Report Channel
- For Analog APRS, you can set up to 8 frequencies here. I have 3 set. VHF on 144.800, UHF on 433.800 and ISS APRS on 145.825. Less clear here, but the top left is 1 in your channel setting Analog APRS Report Frequency.
- TOCALL should be set to APAT81.
- Enter your callsign and SSID
- Enter your desired APRS symbols. APRS Direct has a good List.
- Set your PATH, if you go with WIDE1-1, WIDE2-1 remember there is no comma on this radio.
- Enter the text of your choice
- Make sure your TX is set to
Narrow.
Set up APRS on your channels
The final step (and you've seen this before) is to enable your channels to transmit beacons over APRS. I won't show an example, as they are above, but the trick is to pick the right Digital or Analog report frequency, that you have just set up on the channel of your choice.